
Installing an air locker in your vehicle’s differential can dramatically improve off-road performance by delivering the extra traction needed to conquer steep climbs, deep mud, and uneven terrain. When installed correctly, it transforms the driving experience—turning slipping wheels into a steady crawl over obstacles that would otherwise halt your progress.
But the installation process demands precision. A single misaligned gear, a loose air line, or a neglected seal can cause premature wear or even damage the entire drivetrain. Success lies in the small details—understanding how each component interacts, preparing carefully, and following proven techniques that ensure the air locker engages smoothly and reliably for years to come.
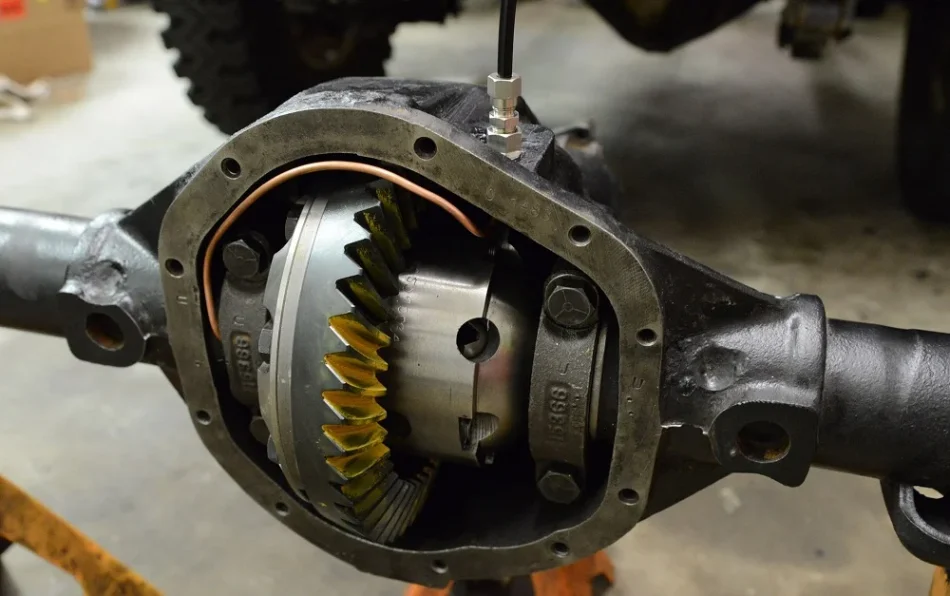
Understanding Air Locker Components
Before beginning an installation, it is essential to familiarize yourself with the main components of an air locker system. An air locker typically includes:
- Differential housing – The main casing that contains the gears.
- Actuator cylinder – Uses compressed air to engage or disengage the locker.
- Control valve – Regulates air flow to the actuator.
- Air lines and fittings – Deliver compressed air from the source to the actuator.
- Seals and O-rings – Ensure the system is airtight to maintain proper function.
Understanding the function of each component helps identify potential points of failure and simplifies troubleshooting during installation.
Preparation Before Installation
Proper preparation is the foundation of a successful air locker installation. Follow these steps to ensure a smooth process:
1. Verify Compatibility
Not all air lockers fit all differentials. Check the manufacturer’s specifications to confirm compatibility with your vehicle’s make, model, and differential type. Using incompatible parts can lead to improper engagement and possible damage.
2. Gather Necessary Tools
Essential tools for installation may include:
Torque wrench
Socket set
Screwdrivers
Needle-nose pliers
Sealant or gasket maker
Air pressure gauge
Having the right tools reduces the risk of errors and streamlines the installation process.
3. Inspect Components
Before installing, inspect all parts for damage or defects. Look for cracks in the housing, worn seals, or bent fittings. Replacing faulty components before installation prevents future complications.
4. Clean the Work Area
Differentials are precision components, and contamination can lead to performance issues. Ensure your workspace is clean, and thoroughly clean all parts before assembly.
Step-by-Step Installation Process
1. Remove the Existing Differential Cover
Start by safely lifting the vehicle and securing it on jack stands. Remove the differential cover and drain the gear oil. Retain the old gasket material or apply fresh gasket maker to ensure a proper seal upon reassembly.
2. Remove the Stock Differential Components
Carefully remove the existing spider gears and carrier assembly. Take note of the shims, bearings, and pinion depth measurements. Proper reassembly requires these measurements to be accurate.
3. Install the Air Locker Carrier
Position the air locker carrier into the differential housing. Ensure proper orientation based on the manufacturer’s instructions. Pay close attention to:
-
Gear alignment – Misaligned gears can lead to noise, premature wear, and failure.
-
Clearance – Verify backlash and contact pattern to ensure smooth operation.
Use a torque wrench to tighten bolts to the specified torque settings.
4. Connect the Actuator Cylinder
Mount the actuator cylinder securely to the differential housing. Connect the air lines and fittings, ensuring they are properly tightened and leak-free. It is important to:
Route air lines away from moving parts and heat sources.
Avoid sharp bends or kinks in the lines.
Use thread sealant on fittings to prevent leaks.
5. Check and Install Seals
Install new O-rings and seals according to manufacturer instructions. This step is critical to maintaining air pressure and ensuring reliable locker engagement. Improper sealing is one of the most common causes of malfunction.
6. Fill with Gear Oil
Once the installation is complete, fill the differential with high-quality gear oil. Check the manufacturer’s recommendation for type and viscosity. Proper lubrication ensures longevity of both the air locker and differential gears.
7. Test Engagement
Before putting the vehicle back on the road, perform a series of engagement tests:
-
Apply air pressure and engage the locker.
-
Listen for unusual noises and check for smooth operation.
-
Verify that the locker fully engages and disengages.
If any issues arise, revisit previous steps to ensure proper alignment, connection, and sealing.
Common Installation Mistakes to Avoid
Even experienced installers can make errors that compromise performance. Avoid these common mistakes:
Incorrect Gear Alignment – Always verify backlash and gear pattern before tightening bolts. Misalignment causes noise and accelerated wear.
Loose or Leaking Air Lines – Check fittings and ensure lines are secure. Air leaks reduce locker reliability.
Neglecting Seal Replacement – Reusing old seals can result in air or oil leaks. Always install new O-rings and gaskets.
Skipping Torque Specifications – Under- or over-torquing bolts can damage the differential or the air locker.
Rushing the Test Phase – Always test engagement before completing the final assembly. Early detection of issues prevents expensive repairs.
Maintenance Tips After Installation
Proper installation is only part of the process. Regular maintenance ensures long-term performance:
-
Inspect Air Lines – Look for wear, cracks, or leaks in the tubing.
-
Check Engagement Function – Regularly test the locker to ensure smooth operation.
-
Change Gear Oil – Maintain clean, high-quality gear oil to protect internal components.
-
Monitor for Unusual Noises – Clunks, whining, or grinding may indicate wear or misalignment.
Routine checks prevent small problems from becoming major failures, preserving both the differential and air locker system.
Advanced Tips for Optimal Performance
For enthusiasts seeking peak performance, consider the following additional tips:
-
Use Quality Air Lines and Fittings – High-grade materials reduce the chance of leaks and improve reliability under extreme conditions.
-
Install a Filter on the Air Supply – Prevents dirt and moisture from entering the actuator cylinder, prolonging its life.
-
Secure Air Lines Properly – Use clamps and routing brackets to prevent vibration damage.
-
Periodically Verify Air Pressure – Ensure the control valve maintains proper pressure to engage the locker fully.
These extra steps can enhance the durability and reliability of your air locker system, especially under heavy off-road use.
Conclusion
Installing an air locker requires attention to detail, careful preparation, and a methodical approach. Understanding each component, following precise installation steps, and conducting thorough testing are crucial to achieving optimal performance. By avoiding common mistakes and performing regular maintenance, your air locker can provide consistent traction and reliability for years of off-road adventures.
A correctly installed air locker not only enhances off-road capability but also protects your differential from excessive wear and tear. Investing the time and effort into proper installation ensures that you get the full benefits of this valuable drivetrain upgrade.